Showing posts with label Easton Place. Show all posts

Friday, August 28, 2015

Grain-Free Granola


I've been living a grain free life for nearly two years now.  If you're not familiar with my grain free decision, you can read all about it here.  I'm very happy with my dietary decision, but there are days I really miss certain foods.  One of those foods is cereal.  I was a big fan of cereal before giving up grains.  I thought I would never know the yumminess of a bowl of crunchy cereal with cold milk again.  I looked through several Paleo granolas and then concocted my own recipe. The other members of my family eat grains, but they all love this grain-free granola. The recipe is super easy. Even though it's technically "baking", you don't have to be as precise with measuring as you would with traditional baking recipes.

What you'll need:
  • 3 cups total of your favorite nuts. (I used pecans, cashews and almonds)
  • 1/4 cup sunflower seeds
  • 1/4 cup pepitas (raw pumpkin seeds)
  • 1/2 cup shredded coconut
  • 2 T sesame seeds
  • 3 T raw honey
  • 2 T organic maple syrup
  • 1 T Madagascar vanilla
  • 2 tsp canola oil
  • 1 tsp ground cinnamon (optional)
  • 1/2 cup diced dried fruit (I like apricots and figs)


Instructions:
  1. Preheat oven to 330℉
  2. Chop the 3 cups nuts with either a knife or food processor until pieces are sized to your liking
  3. In a large glass bowl combine the nuts, all seeds, pipettes and coconut
  4. In a small bowl stir together the honey, vanilla and oil until well combined
  5. Poor honey mixture over the nuts and seeds mixture until all things are evenly coated
  6. You can add the diced dried fruit now if you like, but I personally prefer to add it after baking.
  7. Spread evenly the granola mixture onto a cookie sheet lined with parchment paper
  8. Bake for 12 minutes, then mix the granola, turning etc. and spreading out evenly. Again, bake for 12 minutes or until your granola is golden brown. Keep an eye on the granola for the last few minutes of baking. It can burn quite suddenly.
  9. Remove from oven and allow to cool completely before breaking it apart and storing in an air-tight container. Store in the pantry for a few days (which is how long it lasts in my house) or in the refrigerator for up to two weeks. 
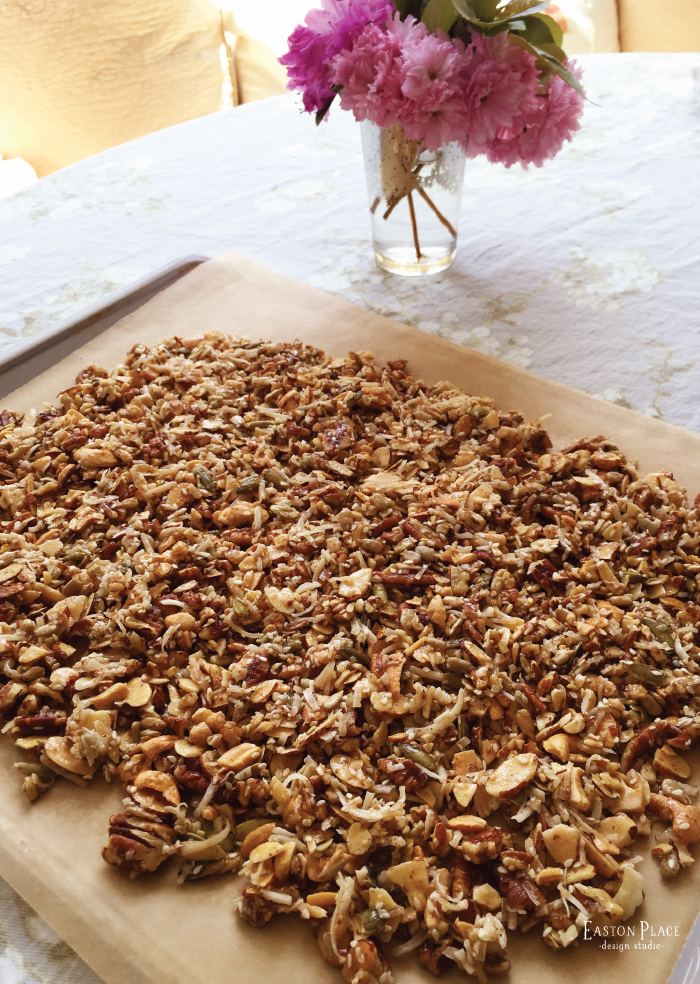
We like to save Talenti Gelato containers. They're perfect for storing the granola. And speaking of gelato, this granola is delicious as a topping. I hope you try this recipe. It's delicious, full of healthy nuts and seeds, is free of processed sugars and grains. Give it a try! If you do, please let me know what you think.


Patti Wunder of Easton Place Design Studio is the designer for this sweet studio. After her kids head to school, Patti creates logos, packaging, sell sheets, web elements and anything else her clients need for their businesses! Along with designing, Patti makes time for a pot of Irish Breakfast tea (one sugar & splash of cold milk), dark chocolate and music!
Website | Instagram | Twitter | Facebook | Pinterest | eastonplacedesigns@me.com 

Monday, November 24, 2014

Packaging Ideas.

Hi everyone! Patti here, from Easton Place Design Studio. Today's post is all about beautiful packaging ideas. None of them break the bank, but all of them tell your clients they've purchased something special. Let's dive right in...


I love everything about this pulled-together-look! It's clean, simple, understated and classic. Here's something fun... these labels are free printables! Just click HERE to go to the site. She offers many printable labels and tags. Go have a look!


This is such a sweet Up-cycled idea for pretty packaging. And here's a tutorial on how to fold the little bags. As far as the pages... check your local library for when they might be hosting a book sale. Large books can sometimes be just $1-$5. The thing I would add to these photos for business packaging, is a custom logo stamp. They cost $20-$50 depending on size, but well worth it! I'm happy to help you with that if you're interested.


I adore simple, clean packaging. This shop has just that. You don't need much to make a statement! The matte boxes are terrific. Simple square elements and clean lettering make a sophisticated statement without breaking the bank.


The unassuming glassine bag... it's wonderful! You can make it look modern or give it an antique nod. It works well with foods, soaps, fabric goods, paper goods... so many items look pretty in a glassine bag. Your items slightly shine through, but aren't fully visible. Add a single stitch or zig-zag and it's just the added touch you need to complete the look. You don't sew, no worries. A single line of mono-adhesive or washi tape will seal the bags. Please refrain from using staples. They can look messy and can also poke fingers. There are many shops on Etsy that sell glassine bags in sets of 50 or 100. If you don't want to take the plunge of ordering a large quantity, give one of the Etsy shops a try. This shop sells 50 bags for $4.50. It's not a huge investment.


Other bags that work well are cello and parchment. In this example, the seller has done a terrific job of adding a belly band with just their company name and product name. It's both simple and modern.


This is specifically for those displaying and packaging bracelets and necklaces... How simple and cute are these chain holders. You could include these in a square jewelry box to keep your chains from tangling during shipping. I would, again, use a custom logo stamp or sticker to brand each tag. This is also a candidate for mono-adhesive. No staples please!


Lastly, these are some packages I use to offer when I sold stationery. The clear boxes allowed the pretty cards to shine through while the twine and ribbon, along with the simple logo card, gave the package a polished look. The cards were ordered through Moo.com. I highly recommend them. They offer high quality card stock in a variety of sizes. Terrific customer service as well. You can design the cards via their site, or upload your custom image.

For more packaging inspiration, and to see the links for all of the images above, please head to my Packaging Pinterest board. If I can help you with your packaging needs, please contact me.


Tuesday, November 11, 2014

Shop Spotlight: Easton Place Designs.


Meet Patti, the designer of the sweet studio, Easton Place Designs. Once her two boys head to school, she has the great fun of creating logos, packaging, sell sheets, web elements, postcards and anything her clients need to turn their business into a brand! She also likes to share some of the things she thinks make life sweeter, like a recipe or a fun place to travel!


"I previously designed and owned a personalized stationery shop. Like so many stay-at-home moms, I was looking for a creative outlet and a way to stay connected to the world outside of story-time, diaper changing and play dates. In the early days of Easton Place, I created custom shadow boxes featuring the birth announcement of the client's child. From there I started designing social stationery, invitations, announcements etc. As my boys have gotten older (now both in HS) and my husband and I are now able to travel more, I've shifted my design business toward the digital world. This really allows me to be away from my studio for an extended period, but still remain connected to my clients and continue to meet my clients' deadlines.


"I've also found over the past couple of years, I really enjoy helping small businesses grow and become the brand they're striving to become. I do this by designing all the business elements they need while giving them a cohesive and professional look that is all theirs! It's often an on-going business relationship. As a business grows or changes, my clients refer to me for continues design help with packaging, postcards, signage, forms etc. It's exciting to be a part of that growth!"


To see more of Patti's products, find her at Easton Place Designs, follow her journal,
or visit her on Twitter, Pinterest, Instagram, and Facebook.

Would you like to be a featured in the Shop Spotlight?
Active Nutmeg Collective members fill out this form!

Follow us:

Hartbeat Facebook Hartbeat Twitter Hartbeat Etsy Bloglovin Bloglovin


Monday, October 27, 2014

Photo Tutorial: iPhone and Camera+

Hi everyone! Patti Wunder here, from Easton Place Design Studio. I'm bringing you a photo tutorial featuring the app Camera+. I've been using this app to take shop photos for roughly two years. Although I do own a lovely Nikon with lots of fancy stuff on it (most of which I have no clue how to use), I have become really comfortable using my phone and this app to take 90% of my product images. It has reduced a lot of the editing time because I do most of the editing on my phone before sending things to my computer or uploading directly. (Disclaimer: Some of the photos are blurry, because I was actually using "screen capture" to get the shot of how I use the Camera+ editing options. It's hard to keep the camera super steady while pushing the two buttons at once. Sorry.)

Okay, let's get started!

(Yes, I my kitchen doubles as my photo studio. Dishes will be done in about an hour.)


(In a perfect photo you wouldn't see my white iPhone either!)
This was a bit blurry, but I wanted to again show you how easy it is to brighten a shot even in a dark space.

I hope this is helpful when thinking about your product photos. I would probably take the final photo a step further to remove the line in the background using iPhoto, but I wanted this tutorial to just show you how easy it is to use your phone and the Camera+ app. When last I looked, the app cost $2.99. Really a deal in my opinion.

Best of luck! Let me know if this helps or if you've used it!

Follow us:

Hartbeat Facebook Hartbeat Twitter Hartbeat Etsy Bloglovin Bloglovin